Lecture Two: Docker
Portability
Recall all of the issues that we’ve run into trying transfer code that we developed on our local machine to a remote host in the cloud. We want to be able to take our application code and seamlessly run it on another machine. Along with Python dependencies, we needed to make sure that system resources, including Python and Poetry themselves, were also installed as expected. How can we avoid all of the dependency and versioning issues we ran into when we manually deployed to EC2? These are the problems that we are addressing when we talk about portability.
We were able to use Poetry and get all of the reproducibility benefits when we deployed to EC2, but just because a build is reproducible does not mean that it’s portable.
The intuition here is that we essentially want to send a copy of our local computer to whoever is going to be running our code. We want the other person to receive a machine that has all of the dependencies needed to run our code already pre-installed.
Containers
Containers allow us to package minimal operating systems as “images” which includes everything our program needs to run. Once we’ve created the image, we can send the build instructions to anyone, and they will be able to build it on their machine to run our code. If you’ve used Virtual Machines in previous classes, you can think of container images as analogous to VM images, but with much less overhead.
Ideally, the build process itself should also be reproducible.
Docker
Docker is the industry-standard implementation for containers. While there are other container implementations, Docker has become something like the “Kindle” or “Kleenex” of container implementations, but there are other implementations which have emerged recently and look to be giving Docker a run for its money.
The Open Container Initiative (OCI) image format is a general specification for how to build container images originally based on the Docker image format. But other tools built against the OCI specification build or run compatible containers, without running any code built by the Docker team. Implementations like podman and containerd are compatible with the OCI specification while improving on some ambiguities in the original Docker implementation. Kubernetes has actually moved away from the Docker implementation recently. We’ll use “OCI container”, “container”, and “Docker container” interchangeably throughout these notes.
Virtual Machines vs. Containers
For each virtual machine, the hypervisor fully emulates every piece of hardware that exists on the machine. Every virtual machine does this emulation individually, so if we have many virtual machines they don’t share the majority of their resources. VMs each run their own kernel to talk to the emulated hardware.
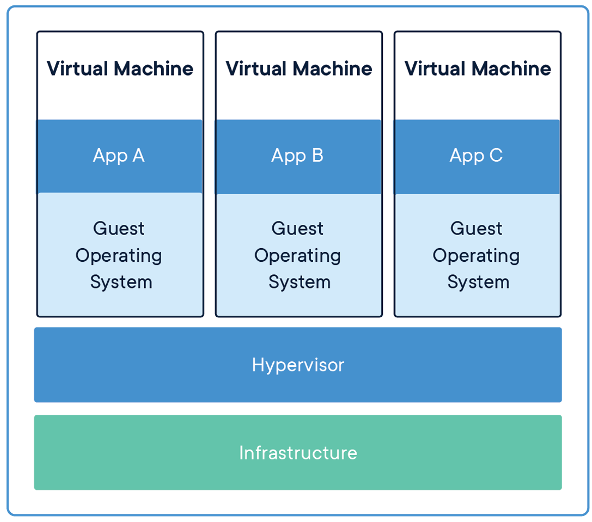
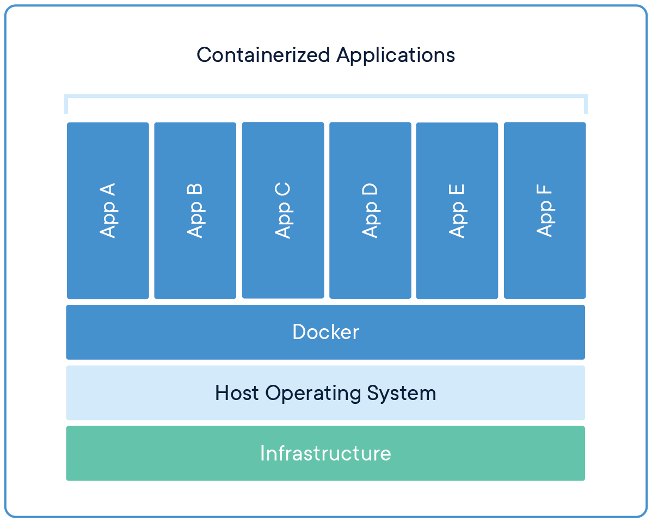
Instead, containers share resources between multiple containers and with the host OS (while still maintaining privacy and separation). This gives us a huge performance increase because emulation is always slower than actual computation. This importantly includes the host OS’s kernel, which talks to the real hardware on the computer. This makes Docker containers much lighter weight than equivalent VMs.
Docker Images
Docker images ideally contain the minimal OS needed to run your application. We only want the programs that are needed to run our application and nothing more.
Docker images are built in layers. When we create a Docker image, it is always extending a base image. This is achieved with a “copy-on-write” filesystem for each image. This means that the filesystem within the image is completely immutable during the build process. Instead of modifying a file in-place, Docker will create an additional image layer with your changes on top of the base image.
Copy-on-write can save us a lot of space because we only ever need one instance of a base image on a given machine. We might have ten images all running on Ubuntu, we still store only one copy of the base Ubuntu image. The ten derivative images will all create new layers on top of the shared base image.
The layers also work as a cache. If we make a change to our container specification that only affects our source code, the underlying layers of the container, where we specify the OS and install dependencies like Apache don’t have to be rebuilt. The container build process can simply rebuild the source code on top of the existing base image, which speeds up build time.
Note that the successive images which we are layering on top only contain the differences. This saves us space initially (we only save the differences, so we don’t store anything twice), but it also means that Docker images strictly increase in size as we continue to add layers on top. Be aware of this as you build your images: if you add something and then delete it in a later image, this still increases the size of the image because the differences are still stored.
Container Runtime
An important distinction in what we’ve been talking about so far is what the difference is between a container and an image. An image is a blueprint for an instance of the code you want to run. A container is running instance of a Docker image. The Docker runtime is what takes an image, creates a container and runs it.
A Docker container is a running instance of a Docker image. Containers still employ a copy-on-write filesystem, layered off of the image they were spawned from. This means any new, updated or removed files during the lifetime of a container are not persisted after a container is stopped (Side note: the picture is a bit more complex in the original Docker implementation, but clarified with most other OCI-compatible runtimes). This means if we want to save any files that are created within a container while it runs, like log files, we have to do something other than save it to the filesystem (like mounting it to a volume that is shared between the container and the host OS).
Docker runtime runs with a single host-wide Docker daemon (depicted in the earlier Docker visualization) which just sits in the background, managing your containers, and processing any requests which you might make with the Docker CLI to interact with the container. Docker’s daemon is considered a single point of failure so some alternative runtimes were designed to manage containers without a long-running, host-wide daemon process.
Publishing
If we are sharing an image with someone, we don’t want them to have to build the image from scratch every time. So, we need some way to publish a Docker image for someone else to use.
The solution here is a registry where we can publish our images so that others can download them. Common examples include:
- Docker Hub
- Google Container Registry (GCR)
- Elastic Container Registry (ECR)
- GitHub Container Registry (unfortunately also abbreviated GCR)
These are essentially the same thing as NPM or PIP, but for Docker images instead of code packages.
Tags
We need some way to identify images so that they are easily available to others. Images name take the form IMAGE_NAME[:tag] where IMAGE_NAME is the name of your project or repository, and tag specifies the version. Examples are node:latest and node:15-buster-slim. If you don’t specify the tag it defaults to latest.
The idea is that we want the tag names to be distinct and predictable. Some common strategies are auto-incrementing so that the tag increases by one every time you create a new version of the image, using conventional versioning nomenclature (think node 3.1.4 or python 3.6.2), or using the SHA of a Git commit so that you can associate a image with a version your code.
Demos
Docker
As a short introduction to Docker, we’re going to pull down a Docker image running Ubuntu and run that image in a container on our machine. To get started, first ensure that Docker Desktop is up and running on your machine. Then, we can pull the latest version of Ubuntu, a Linux distribution which will run on our container (you can read more here):
$ docker pull ubuntu:latest
latest: Pulling from library/ubuntu
da7391352a9b: Pull complete
14428a6d4bcd: Pull complete
2c2d948710f2: Pull complete
Digest: sha256:c95a8e48bf88e9849f3e0f723d9f49fa12c5a00cfc6e60d2bc99d87555295e4c
Status: Downloaded newer image for ubuntu:latest
docker.io/library/ubuntu:latest
It’s important to note here that when we tell Docker to pull the latest version of Ubuntu, it actually does three separate pulls from three separate images. This is because Docker images are build inherently from layers. Each pull is for a different layer of the image, and they are built on top of each other to produce the final product.
When you think about it, this is a really smart way to create Docker images. Let’s imagine a Docker container that runs Redis, the caching server that acts as a data store. To run Redis, we first need to have a Linux distribution installed, so we can add that as a lower layer of the Docker image which Redis then builds on top of by installing the specific Redis software.
So, now that we have this Ubuntu Docker image installed, what can we do with it? Let’s spin up the container and play around with it:
$ docker run -it --rm --name ubuntu-demo ubuntu
# This will open a terminal within the container running Ubuntu thanks to the "-it" flag
# Now let's check to make sure we are actually running the latest version of Ubuntu
root@260a8119abd6:/# cat /etc/os-release
NAME="Ubuntu"
VERSION="20.04.1 LTS (Focal Fossa)"
ID=ubuntu
ID_LIKE=debian
PRETTY_NAME="Ubuntu 20.04.1 LTS"
VERSION_ID="20.04"
HOME_URL="https://www.ubuntu.com/"
SUPPORT_URL="https://help.ubuntu.com/"
BUG_REPORT_URL="https://bugs.launchpad.net/ubuntu/"
PRIVACY_POLICY_URL="https://www.ubuntu.com/legal/terms-and-policies/privacy-policy"
VERSION_CODENAME=focal
UBUNTU_CODENAME=focal
We can see that the Docker container is running a fresh install of Ubuntu. Now, we could do all manner of things with this Ubuntu container: install new software, expose ports, connect to a network, run a web server, etc. However, actually doing these things manually within the Ubuntu terminal is not reproducible; we would have to perform those same operations every time we wanted to spin up a new container. Hence, a Dockerfile. When we write a Dockerfile it is essentially an instruction manual for how the Docker image should be run, so that all of the installation and configuration of whatever toolchain we need on our container can be written out concisely once and only once.
However, feel free to try out different commands or installing different software on the Ubuntu container. It works the same as any other Linux command line interface and there is a lot you can do with it.
Building an App on Docker
We’re going to provide you with some of the starter code for a Node application. We’re going to put this application within a Docker container and see how the development process (updating the app) is influenced by the application being containerized. To get the starter code, you can clone the course website repository and enter the node_demo directory:
# Clone the website from Git to your local machine
$ git clone https://github.com/cis1880/website.git
# Enter the node_demo directory
$ cd website/demos/node_demo
First, take a look at the different files in node_demo to get a sense of how package dependencies are being managed and how the Docker Container is configured. Within the Dockerfile there are descriptions of every command explaining their purpose, definitely read through this and as it will be helpful when you write your own Dockerfile for the homework!
Before we carry on to modifying the application, there is a little nuance in the Dockerfile that we should underscore. Taking a look inside the Dockerfile, note that we copy over the package.json and package-lock.json files before installing our dependencies:
# Copy over package.json and package-lock.json (these files
# contain the necessary dependencies for our project)
COPY package*.json ./

# Install dependencies for our project
RUN npm install
Why don’t we just install the dependencies and then copy everything over at once? The answer is that Docker is smart and if the files package.json and package-lock.json have not changed, it can skip the following build steps where it installs the dependencies and copies them over. This works because the two files package.json and package-lock.json contain all of the Node dependencies, so if they have not changed we know that the dependencies have not changed.
Now, let’s build the Docker image and start up the Docker container (make sure you’ve entered the node_demo directory):
# Build the Docker image from our Dockerfile
$ docker build --tag node-demo-image .
# Run the Docker container with port 8080 exposed
$ docker run -p 8080:8080 --name node-demo-container node-demo-image
Server running at http://0.0.0.0:8080/
Navigate to (http://localhost:8080/)[http://localhost:8080/] and you can see the Hello world! message. So, let’s make some changes to this web application and see what we need to do in our Dockerfile to support those changes (spoiler alert: not very much, Docker makes the development process pretty seamless).
Let’s say we needed to generate unique user IDs if we were saving users into a database. There’s an Node package called uuid, let’s install that and see how Docker handles adding a new package. We can type:
$ npm install uuid
then, let’s modify line 10 in our index.js file form
res.end('Hello World!');
to be
res.end('Hello World: ' + uuidv4());
and also put this import statement at the top of the file
const { v4: uuidv4 } = require('uuid');
then, when we re-build our Docker container we will see this new Node package installed, and our index page will be modified:
# Delete the previous node-demo container (cannot have duplicate container names)
$ docker container rm node-demo-container
# Rebuild the node-demo-image
$ docker build --tag node-demo-image .
# Recreate the node-demo container
$ docker run -p 8080:8080 --name node-demo-container node-demo-image
Server running at http://0.0.0.0:8080/
Navigate back to localhost:8080 and you will see that the page now displays something like “Hello World: 0b431e86-49f0-4678-9b34-ff8939c1201b”. So, the installation and setup of our uuid package worked!
This is pretty concise. When we make a change to our development environment (here we installed a new dependency), Docker makes it pretty seamless to also apply change to the Docker container’s environment. However, we still have some parts of the process which can be streamlined further. This is something we’ll address later in the course when we talk about Docker-compose!